
How to Set Up Squarespace Scheduling
Squarespace Scheduling is an online booking and scheduling tool that allows you to create and manage your online calendar and bookings for your blog or business. In this section, we will show you how to set up Squarespace Scheduling in a few simple steps. You will need a Squarespace account and a website to use Squarespace Scheduling. If you don’t have one, you can sign up for a free trial here.
- Step 1: Go to your website dashboard and click on “Scheduling”. This will take you to the Squarespace Scheduling dashboard where you can access all the features and settings of Squarespace Scheduling.
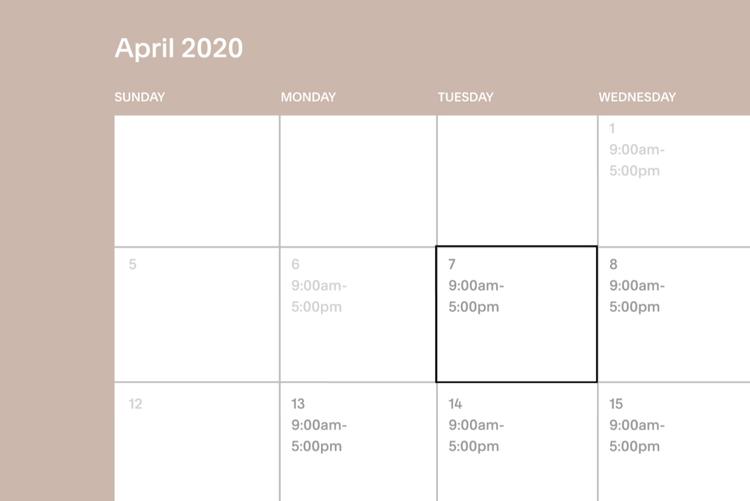
- Step 2: Click on “Availability” to set up your availability and schedule for your bookings. You can choose from different types of availability, such as regular weekly availability, specific dates availability, or custom availability. You can also add or remove time slots, adjust your time zone, set up buffer times, block off days or hours, and sync with your external calendar.
- Step 3: Click on “Services” to create and manage the services or events that you want to offer and accept bookings for. You can choose from different types of services or events, such as appointments, group events, classes, packages, subscriptions, or gift certificates. You can also add or edit the details of each service or event, such as the name, description, duration, price, capacity, location, etc.
- Step 4: Click “Clients” to view and manage your clients’ list and booking history. You can see the details of each client and booking, such as the name, email, phone number, service name, date, time, location, payment status, etc. You can also add notes or tags to each client or booking, edit or cancel a booking, reschedule a booking, issue a refund or partial refund, send a confirmation email or reminder email, etc.
- Step 5: Click on “Forms” to create and manage the forms that you want to collect information from your clients when they book with you. You can choose from different types of forms, such as intake forms, feedback forms, waiver forms, etc. You can also add or edit the fields of each form, such as the name, type, label, placeholder, required option, etc.
- Congratulations! You have successfully set up Squarespace Scheduling for your blog or business. You can now start accepting bookings online and grow your blog or business.
How to Customize Your Booking Page and Confirmation Emails
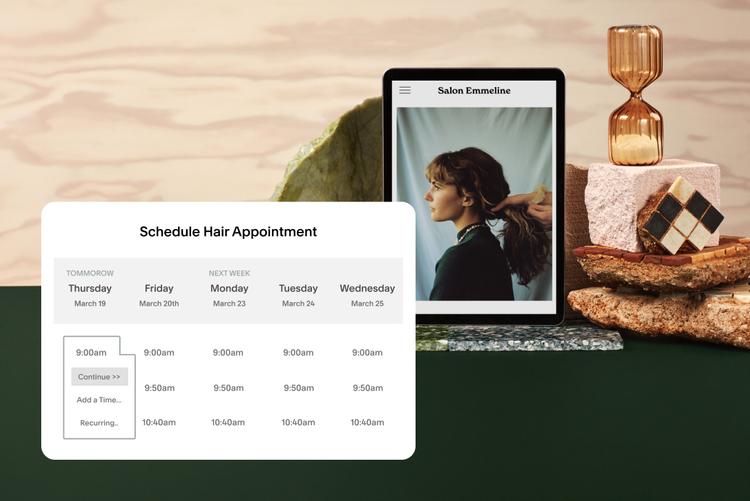
Squarespace Scheduling allows you to customize your booking page and confirmation emails to match your brand and style. You can change the colors, fonts, images, logos, and other elements of your booking page and confirmation emails to make them look professional and appealing. You can also add or edit the content of your booking page and confirmation emails to make them informative and engaging. To customize your booking page and confirmation emails, follow these steps:
- Step 1: Go to your website dashboard and click on “Scheduling”. This will take you to the Squarespace Scheduling dashboard where you can access all the features and settings of Squarespace Scheduling.
- Step 2: Click on “Design” to access the design settings for Squarespace Scheduling. You can choose from different categories of design settings, such as booking page, confirmation emails, logo, favicon, etc. You can also preview how your booking page and confirmation emails look like on different devices, such as desktop, tablet, or mobile.
- Step 3: For each category of design settings that you want to customize, click on the settings icon to configure the design options and preferences. You can also use the color picker or enter a hex code to change the colors of your booking page and confirmation emails. You can also upload images or logos to your booking page and confirmation emails. You can also adjust the size, alignment, spacing, padding, margin, border, shadow, etc. of your booking page and confirmation emails.
- Step 4: Click on “Content” to access the content settings for Squarespace Scheduling. You can choose from different categories of content settings, such as booking page title, booking page subtitle, booking page footer, confirmation email subject line, confirmation email body text, etc. You can also add or edit the text of your booking page and confirmation emails. You can also use placeholders or variables to insert dynamic information into your booking page and confirmation emails, such as client name, service name, date, time, location, etc.
- Congratulations! You have successfully customized your booking page and confirmation emails for your blog or business. You can now impress your clients and customers with your booking page and confirmation emails.
You can add images to this section to illustrate each category of design or content settings or show examples of how your booking page or confirmation emails look like after customization. For example:
How to Manage Your Bookings and Clients with Squarespace Scheduling
Squarespace Scheduling allows you to manage your bookings and clients with ease and efficiency. You can view and manage your bookings and clients list, edit or cancel a booking, reschedule a booking, issue a refund or partial refund, send a confirmation email or reminder email, add notes or tags to a client or booking, and more. To manage your bookings and clients with Squarespace Scheduling, follow these steps:
- Step 1: Go to your website dashboard and click on “Scheduling”. This will take you to the Squarespace Scheduling dashboard where you can access all the features and settings of Squarespace Scheduling.
- Step 2: Click on “Clients” to access the client’s list and bookings history for Squarespace Scheduling. You can see the details of each client and booking, such as the name, email, phone number, service name, date, time, location, payment status, etc. You can also filter or sort your client’s list and bookings history by different criteria, such as date range, service name, payment status, etc.
- Step 3: For each client or booking that you want to manage, click on the action icon to perform the action that you want. You can choose from different actions, such as editing a booking, canceling a booking, rescheduling a booking, issuing a refund or partial refund, sending a confirmation email or reminder email, adding notes or tags to a client or booking, etc. You may need to enter some information or select some options to complete the action process.
- Congratulations! You have successfully managed your bookings and clients with Squarespace Scheduling. You can now keep track of your bookings and clients and provide them with excellent service.

How to Track and Analyze Your Booking Data and Performance with Squarespace Scheduling
Squarespace Scheduling allows you to track and analyze your booking data and performance with Squarespace Analytics. You can access Squarespace Analytics from your website dashboard or from the Squarespace app on your mobile device. You can view and monitor various metrics and insights related to your booking and scheduling system, such as the number of bookings, the revenue generated, the conversion rate, the cancellation rate, the most popular services or events, the most active clients or customers, etc. To track and analyze your booking data and performance with Squarespace Scheduling, follow these steps:
- Step 1: Go to your website dashboard and click on “Analytics”. This will take you to the Squarespace Analytics dashboard where you can access all the features and settings of Squarespace Analytics.
- Step 2: Click on “Scheduling” to access the scheduling analytics for Squarespace Scheduling. You can see the overview of your booking data and performance, such as the total bookings, total revenue, average revenue per booking, average bookings per day, etc. You can also filter or sort your scheduling analytics by different criteria, such as date range, service name, client name, payment status, etc.
- Step 3: For each metric or insight that you want to track and analyze, click on the metric or insight icon to access the detailed report or chart. You can see the breakdown of your booking data and performance by different dimensions, such as service name, client name, date, time, location, etc. You can also compare your booking data and performance across different periods, such as month-to-month, year-to-year, etc.
- Congratulations! You have successfully tracked and analyzed your booking data and performance with Squarespace Scheduling. You can now use this information to improve your booking and scheduling system and grow your blog or business.
Some alternatives to Squarespace Scheduling are:
- Calendly: A popular online appointment scheduling software that integrates with various platforms and tools, such as Google Calendar, Zoom, Stripe, etc. You can create and share booking links and widgets, customize your availability and booking preferences, and track and analyze your booking data and performance.
- Site123: A website builder that allows you to create and manage your booking and scheduling system for your blog or business. You can add a booking page to your website, create and share booking links and widgets, accept online payments, send email confirmations and reminders, and sync your bookings with Google Calendar. Shopify: An ecommerce platform that allows you to create and manage your online store and sell your products or services. You can also use Shopify to create and manage your booking and scheduling system for your services or events. You can add a booking app to your Shopify store, such as BookThatApp or Sesami, that allows you to create and share booking links and widgets, accept online payments, manage your inventory and availability, and track and analyze your booking data and performance. Shopify offers a 14-day free trial and paid plans for different levels of features and support3.
These are some of the alternatives to Squarespace Scheduling that you can consider. You can also check out other alternatives, such as Wix, Webflow, Carrd.co, Pixpa, WordPress, Duda, GoDaddy, Strikingly, etc., depending on your needs and preferences423.
Some of the features that Squarespace Scheduling offers are:
- Client self-scheduling: You can allow your clients to book appointments with you online, without any back-and-forth communication. You can set your availability, services, and prices, and create and share booking links and widgets with your clients. Your clients can choose a time slot that works for them, fill out an intake form, and pay online if required12.
- Unlimited appointments: You can create and manage as many appointments as you need, without any limits or fees. You can also create recurring appointments, group events, classes, workshops, and more12.
- Email and text reminders: You can send automated email and text reminders to your clients before their appointments, to reduce no-shows and cancellations. You can also send follow-up emails and thank-you notes to your clients after their appointments12.
- Multiple locations and staff: You can manage your bookings and scheduling across multiple locations and time zones. You can also add multiple staff members to your account, assign them different services and availability, and let your clients choose who they want to book with12.
- Customizable website templates: You can create a professional and beautiful website for your blog or business using Squarespace’s website builder. You can choose from hundreds of customizable templates, add your own content and images, and integrate Squarespace Scheduling with your website. You can also use Squarespace’s premium features, such as commerce, analytics, domains, etc., depending on your plan13.
These are some of the features that Squarespace Scheduling offers.
To customize your booking links or widgets with Squarespace Scheduling, you have a few options:
- You can use the Scheduling block to display your scheduling page on your site.
- You can use the Advanced widget option to create a custom widget that only shows specific staff and services.
- You can use the Client Scheduling Page option to get a direct link to your scheduling page.
These are some ways to customize your booking links or widgets with Squarespace Scheduling.
Do you have any questions about these options? Do you need any more help?
how to add booking links or widgets to social media with Squarespace Scheduling
To add your booking links or widgets to social media with Squarespace Scheduling, you have a few options:
- You can use the Social Links block to add icons to your pages that link to your social media profiles. You can customize the icons by choosing a style, a size, and a color1.
- You can use the Embed option to embed a third-party booking widget using a code block on Squarespace. You can copy the widget embed code from your Square Appointments dashboard or from other booking platforms23.
- You can use the Pushing content option to automatically share new content from your site to your social media profiles. You can connect your site to Facebook, Twitter, Instagram, and more4.
These are some ways to add your booking links or widgets to social media with Squarespace Scheduling. You can also check out this guide for more ideas and inspiration5.
How to track and analyze social media performance with Squarespace Scheduling
To track and analyze your social media performance with Squarespace Scheduling, you have a few options:
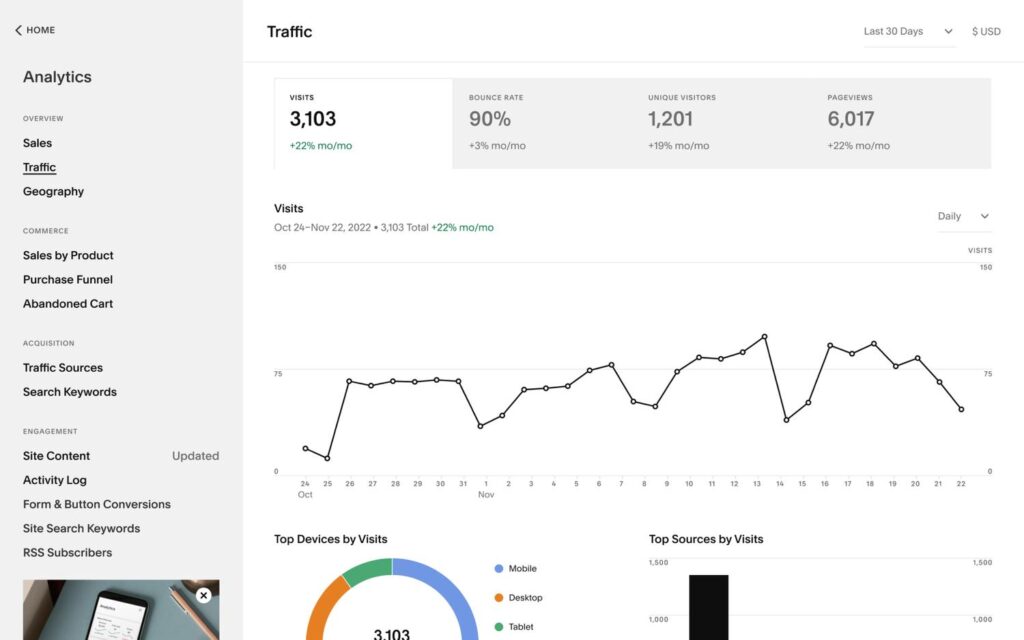
- .You can use the Squarespace Analytics to view various metrics related to your website traffic, such as visitors, page views, referrals, and conversions.
- You can use the Google Analytics to connect your site to Google and access more advanced data and reports, such as bounce rate, demographics, and behavior.
- You can use the Social Media Audit to create a spreadsheet that tracks key metrics for your social media profiles, such as followers, engagement, reach, and sentiment.
- You can use the Social Media Scheduling Tools to automate and streamline your social media posting, and also access some analytics features, such as best times to post, optimal frequency, and content performance6
These are some ways to track and analyze your social media performance with Squarespace Scheduling.
Conclusion: Why You Should Use Squarespace Scheduling for Your Blog or Business
Squarespace Scheduling is a powerful and versatile tool that can help you create and manage your booking and scheduling system for your blog or business. You can integrate Squarespace Scheduling with other tools and platforms that you use, manage your bookings and clients with ease and efficiency, create and share booking links and widgets with your clients and customers, and track and analyze your booking data and performance with Squarespace Analytics. By using Squarespace Scheduling, you can save time, money, and hassle, and provide a better service and experience to your clients and customers.
If you want to learn more about Squarespace Scheduling, you can visit the Squarespace Scheduling website or the Squarespace Help Center. You can also sign up for a free trial or a paid plan to start using Squarespace Scheduling today.
We hope you enjoyed this blog post and found it useful. If you have any questions or feedback, please leave a comment below or contact us. We would love to hear from you. Thank you for reading! 😊
Do you like this example? Do you need any more help?